My psychiatrist told me I was crazy and I said I want a second opinion. He said okay, you’re ugly too. - Rodney Dangerfield
Be in IT for a while and you start to get a sense that - if its related to computers you can do it. I’m reasonably sure of my abilities, and in particular my ability to google up anything I don’t know, and so I considered a home server for a while. I’m always turning up a virtual machine on my workstation or wishing I could run x, y and z applications 24/7 on a system besides my main tower. Mostly though I’ve started amassing a large amount of DVD rips and wanted to have some sort of file storage option that didn’t involve USB drives hanging off a HTPC in my living room. Part of the reason for this blog post is that in preparing for this project I was reading forums and blog posts from all over the place. There’s a lot of great information out there but its a bit like putting together a puzzle.
If you start looking into small NAS projects you’ll likely run into folks in two camps, one running dedicated devices and the other rolling their own server. I can’t speak for dedicated devices like those from Synology or Drobo. Ultimately I decided that if I was going to shell out some coin for a system I want something that can do more with than just serve files. Synology has this whole ecosystem of apps for their devices but it feels like wasted knowledge to learn too much about that. However I will say on the tail-end of this project that my sanity might have been better maintained just going with a purpose-built NAS device.
Basically what I ended up with is a home server built to run ESXi at its core. With a virtual machine for running FreeNAS and another to run Server 2012. And then with enough spare resources to turn up future VMs for additionals servers, projects, testing, whatever.
FreeNAS, based on FreeBSD, is an OS completely devoted to functioning as a NAS - for storing and sharing files. The feature that the FreeNAS crowd really get excited about is the ZFS file system and its RAIDZ software RAID. When looking at serious file storage, no matter how you set things up, some sort of RAID is probably going to be involved. RAIDing your disks gives you a large pool of storage, rather than several individual disks. It gives you some breathing room if one (or more, depending on setup) disks dies. It can provide better performance than any single disk (performance is another selling point of ZFS - its damn fast).
There are a lot of different options with RAID. In most enterprise settings you’re going to have a hardware controller. Basically a card, or on motherboard device, dedicated to managing your RAID. The problem with this for home setups is unless you’re doing something really simple, like two drives in a mirror, you really have to shell out some cash for a decent RAID card. Basically they’re their own little computers. And what happens if your RAID card dies? Well… good luck.
Here-in lies a big advantage of FreeNAS and ZFS. Theoretically your entire server could die. FreeNAS itself dead, whatever. Everything is on the disks though so as long as they’re ok you just load up another instance of FreeNAS, import your ZFS volume… and you’re back in business.
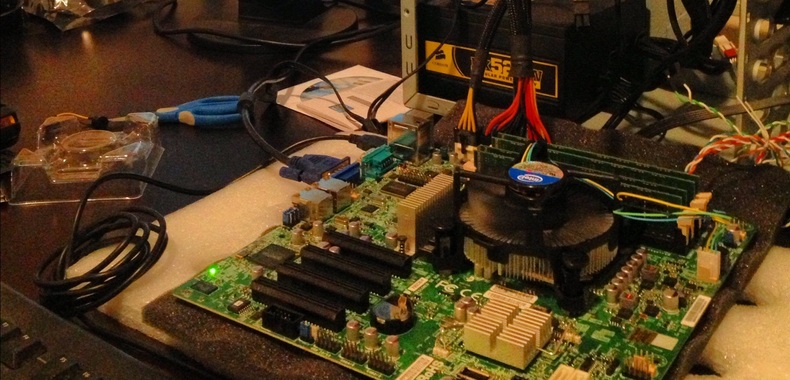
Hardware
I found a lot of the same hardware recommended online. Supermicro motherboard, Intel Xeon i3. Mostly I just followed the buying guide here.
- CPU - Intel Xeon E3-1230 Sandy Bridge 3.2GHz (Newegg)
- Motherboard - Supermicro MBD-X9SCM-F-O (Newegg)
- Memory - I differed here from the guide linked above, prices have come down and I grabbed 4 sticks of Kingston 8GB KVR13E9/8I for 32 GB total (Newegg). 32GB is the max amount of RAM that the free version of ESXi will support.
- ESXi install drive - This is a flash drive that ESXi will be installed on. The OS consumes the entire drive its installed on and doesn’t really hit the disk once booted so a flash drive is ok here. Plus the motherboard has an internal USB port for this. (Newegg)
- Storage HDDs - 5 x Western Digital Red WD30EFRX 3TB. WD Red drives are ready made for NAS systems, apparently. I just like the longer warranty.
- VM storage - The storage drives are going to be linked directly into a FreeNAS VM so we need yet another drive to store the actual VM virtual disks. I just found a SSD with good reviews on Newegg for this. OCZ drives aren’t very popular due to firmware issues but I’ll take my chances.
- RAID Card - More on this later, IBM m1015 (eBay). Also you’ll need mini-SAS SFF-8087 to SATA cables for this card (Newegg).
- The case and power supply I had laying around. If I were doing this again I would definitely buy something new, particularly the case. The Cooler Master case only has a few 3.5 bays for HDDs and I lost the rails for 2 of them. So basically I had to cobble things together. Something like this Lian Li case and SeaSonic PSU would work much better. I also purchased a few new case fans to try to cut down on noise (fans shipped with the case were junk). Be sure to get 4-pin fans if you elect to grab some, the Supermicro motherboard likes to control the speed of the fans. 3-pins will work, they’ll just run at max RPM constantly. I believe the motherboard has five fan connections.
The IBM Raid card won’t actually be providing RAID. Instead we’ll change the operating mode to pass the drives through directly to the system. Sort of like a SATA expansion board except better for a few reasons. The m1015 cards have been appearing on eBay for super cheap and come highly recommended by those doing these sort of setups. You can also hang a TON of drives off the card, the mini-SAS cables linked above allows for 8 drives (4 drives per port) but you can add many more (up to 64) with SAS expanders.
The Build, RAID card setup and ESXi install
Updating the BIOS and flashing the IBM Card
Putting the system together is pretty standard fare. We should update the BIOS on the Supermicro board out of the box. They actually don’t recommend BIOS updates if there isn’t some feature or issue you need specifically addressed but since the system isn’t actually in production (so to speak) we might as well go ahead and get the latest and greatest on there.
This process can be kind of a pain in the ass. You need a DOS bootdisk. The way I like to set this up is using a tool from HP to make a flash drive bootable. This blog post on ExtremeOverclocking.com has everything you need. You can grab the latest BIOS from here.
Go ahead and label the WD Red drives with their serial number and maybe a nickname. I used Norse gods. If a drive fails later on and you don’t have it labeled you’re gonna have to pop each drive out and check the serial number in order to determine which drive actually died. Unless you get some fancy enclosure with drive indicators.
We also need to put our IBM RAID card in “IT” mode. This is slightly more of a pain in the ass than updating the BIOS on the motherboard. Normally this would also be done using a DOS bootdisk except on this particular motherboard model the update will give you a “Failed to initialize PAL” error when run from DOS. So we need to use the UEFI BIOS shell on the motherboard. Read through this blog post for the commands and files needed to flash the firmware, you can just download the files to a flash drive. Then follow this guide from Supermicro to access the UEFI shell. Note that the actual “sas2flash” command is different in UEFI, if you do a directory listing of the firmware files you’ll see it highlighted as a UEFI compatible executable.
ESXi installation
Now we can finally install ESXi. This is the headless virtual machine host OS from VMware. Headless meaning there’s no GUI, you configure VMs remotely. And just to save a little face. I am not an ESXi expert. I’d barely consider myself a novice. Besides some work on monitoring ESXi systems I have never done much beyond the basics through work and this was the first time with the software for personal use. So with that in mind… load your ISO onto a CD or flash drive or you can get fancy and use the Grub4DOS method detailed here. The ESXi install should be pretty straightforward, just make sure you install to your USB flash drive connected directly to the motherboard. Once installed browse to the IP address of the server to download the vSphere client you’ll use to configure the system.
FreeNAS VM setup
At this point ESXi is installed and you can use the vSphere client to access the system. You’ll want to add that SSD as your primary datastore. This is handled from Configuration > Storage > Add Storage in vSphere. You can mostly next-next-finish through the wizard.
To setup the FreeNAS VM follow the guide here. We want to give the VM 1 GB of ram per TB of storage. I’m not sure if this is total TB or usable after setting up RAID so I went with giving FreeNAS 16GB of RAM. (edit - I lowered this to 12 GB of RAM after running for a while and I haven’t noticed a difference in performance)
Now we need to setup what’s called Raw Device Mapping for our WD Red drives. This attaches the drives to the VM in the most direct way possible so the file system, etc aren’t touched at all by ESXi. From within vSphere go to Configuration > Software > Advanced Settings > RDMFilter and uncheck the RDMFilter option. This is the quick version of a much more complicated solution detailed here which apparently only works on some hardware. Luckily it works on all LSI IT flashable cards.
Once this is complete you should now be able to add hard disks to your VM, select Raw Device Mappings and then select the physical hard drive’s attached to the RAID card. Also place the discs on a new SCSI channel (a channel other than the one used by the base virtual disk the FreeNAS OS will be installed to). This just makes thing neater if you add more storage later.
With the hardware for the FreeNAS VM configured we’ll want to boot it up and setup networking. I like to use static addresses for anything that’s going to be on all of the time so that’s what I did with FreeNAS. Also unrelated to this project but I’ve been taught over the years that trusting DHCP reservations is a bad bet, just set static IPs outside the range of IPs your DHCP server assigns leases from.
Now that networking is configured you can access FreeNAS via its IP address and continue configuration. Unfortunately I didn’t document this part of my setup very well as it’s kind of self explanatory, particularly if you plan on making just one large pool of storage from all of your disks. This post goes into the details except I veer off after creating the Dataset. I don’t do any actual sharing or other work with the storage within FreeNAS.
iSCSI
Being a Windows guy I’m most comfortable working in Windows. So the conclusion of my setup would probably make a lot of NAS die hards roll their eyes really hard but at this point I linked my ZFS volume directly into a Server 2012 VM via iSCSI (following the guide here). iSCSI is basically a method of having a disk in one system actually live on another and be accessed over the network. I could have simply linked the disks to my Server 2012 VM and used Windows built-in RAID but I don’t trust it as much as the recommendations for RAIDZ. I do however like controlling access and doing all my media serving in Windows. Although who knows, my next blog post might be about me changing everything to a Linux setup. So yeah, haters goin’ hate and all that.
That’s the basics of the project. I would have liked to have gone into more detail with FreeNAS and the iSCSI setup but I took a very long break from writing this post and, as my mind is want to do, I pretty much forgot everything. At this point I have about 4 VMs running on the ESXi server with a few that get cycled on and off as needed for work. It’s been a rock solid system, no downtime as of yet. Knocks on wood
Update 12-3-2013 Almost a year later and this server is still kicking it. My only real limiting factor has been the tiny SSD I bought for VM storage. I’d also feel a lot better having two larger SSDs in a RAID mirror for the VM storage. As it stands now if that SSD dies I’m going to be spending a lot of time rebuilding things.
I recently finally replaced the COUGAR CF-V12HP fans I originally ordered for the case. These fans make a very annoying high pitched whine when they are not spinning at max RPM, which they shouldn’t be if connected properly to this motherboard. I replaced these with Noctua NF-F12 PWM fans which are completely silent.
Finally, I’ve stopped ordering from Newegg. Amazon is typically going to have better prices and ship times. Newegg is still nice for their search tools however.